Thursday, September 15, 2022

Brotherhood and Unity Review?


 Hello readers, it has been a while since my last post.  I must say that having any readers at all makes me feel quite special, so thank you.  It is too bad I don’t know how to turn on comments but I don’t think I am actually the administrator to this blog.  Someone just gave me a key a while ago and forgot to change the locks… Anyway, since my last post I have moved houses and in fact moved countries.  Luckily I know people in my new town so I have another group to play with.  They are more board gamers than miniature gamers but I suspect some of them can be turned!

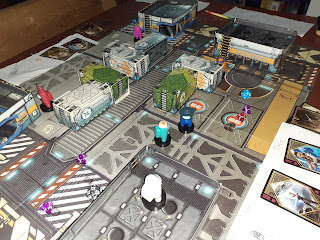
About a week ago we played a board game called Brotherhood and Unity.  It is a classic style cardboard units on a hex map (there are no hexes but operational objectives) game, perhaps a great uncle of the miniature games I now enjoy. As you can guess from the photos it is about the war that broke up the former Yugoslavia, focusing on Bosnia.  And that is the reason for this post.  I will review the game, which does have cool mechanics and historic value, but I really want to think about how I should play games that actually represent human suffering and, in this case, documented war crimes.

So, about those mechanics….  At its core this is an area control war game, expanding your control increases your victory points.  At the end of the game victory points are modified by the different nation’s special rules and the winner is the player with the most points.  All of the units on the map represent military units.  They each have a combat power, defensive value, and road move value.  The combat mechanic is simple, units that are going to engage in battle may move one location, think of it as a tactical move and not an administrative road move, then combat values of both the attackers and defenders are summed and each player roles a die and adds terrain effects which determines the combat multiplier that is then multiplied by the combat value (sounds complicated but if you can multiply by 1.5 you will do fine J). This final value represents the total damage inflicted, the enemy then subtracts the defensive value of one of its units (this unit is damaged and then flipped or removed).  This process is repeated until the combat value is too small to subtract a whole defensive value. To be honest I like it, it plays fast and has sufficient granularity for the operational level.  It also means that, often, when small groups fight each other nothing happens.  Combat is spiced up a bit by a nation specific hand of cards that each player gets.

Bigger picture, the game has four “Turns” each turn the players get a new hand of cards and new nation specific special rules.  The turns consist of the players playing their cards sequentially (which activates military units) until they are out of cards, then the next turn begins. 

I do think the game has historic value.  The place names are accurate and the setup is a good approximation of the war in its early stages.  Also, the cards have special rules on them that represent things that actually happened, all be it in a different order. Sadly, this historic setting does provide pretty big railroads so re-play-ability is limited, if I had to guess, after ten games it would start to repeat. There is also a pan game mechanic that represents international opinion and yes the Serbs can get bombed by NATO but in the game the Croats could as well.

So back to my question.  How should I play a game like this?  Should a disclaimer be read at the beginning to all players that states this game represents an actual war and then provide some details on the war crimes that were committed by all parties to raise awareness and not minimise the human tragedy? Should the game not be played at all?  Is it okay for one player to giggle after another player attacks a UN safe zone in order to efficiently gain victory points to then be bombed by NATO because their token has reach the end of the international tolerance track? I do prefer fictitious themes, as it allows me to forget about the real world and just roll dice.

Monday, June 13, 2022

Dead Man's Hand - Thoughts


Yesterday my good friend introduced me to a skirmish game called Dead Man's Hand.  I found it to be a fast paced and engaging game.  It has a very thematic Wild West setting, that pits rival gangs against each other in situations reminiscent of your favorite western.  Thanks in part to all the great scenery my friend has (but hasn't painted :) ), it is very easy to imagine your gang members crashing through saloon windows or unloading their shot guns at point blank range, and the random activation using playing cards are great!


The main mechanic I had not seen before is the random activation of the models.  At the start of each turn one card is drawn by each player and then assigned to one gang member face down, the rest of the gang members are dealt face down cards.  The cards then get flipped and the gang member assigned the highest card gets to activate first.  Activation is easy, choose three; move, shoot, aim, reload (clear a jam), charge, heal?,  etc.. It is a very fast mechanic and after the first turn I was off and running.  Between each turn there is also a random western themed event. like distractions form the saloon, creates of money, or grumpy sheriffs. 

In the first game, my group of Apaches were rescuing a friend who had been sent to the gallows, while my opponent was the gang that brought in the guilty party and was determined to see justice served.  We finished it in about an hour and then my warriors were onto their second mission of busting a friend out of jail. Which raises the question, who were these Apaches hanging out with? 


If I were to have a critique, I would say that in the basic rules that we played variance was a big factor and there was little a player could do to mitigate a bad roll.  It is my understanding that if you play with the actual playing cards designed for the game then there are special rules written on each card (some cards are kept in your hand) and these special rules can modify the dice.

Anyway, shooting is done with a D20 and fighting is done by comparing D10 rolls of the attacker and defender.  There are ways to modify the rolls, so aiming gives you a plus one, every shot after the first is a minus one (this is cumulative), each "wound" that a player has is a minus one. So on occasion the modifiers do add up, but often it is a 50/50 chance of success, which is fine but it did feel a little fluky in the two games we played.


Something that this game did have some of but could have more of, is interacting with terrain or bodies of gang members.  I think it would be really cool if you could grab an improvised weapon if fighting in a saloon or take the Winchester from the limp body of a deputy.  Since the basic mechanics are so elegant I really think this would be easy to incorporate. After all you do track shots and have to reload, this doesn't slow the game down at all.


The next day my kids ask if we could invent a board game, and I decided to try and mimic Dead Man's Hand.  It turned out to be very easy and fun for the kids (11 and under).  We found some toys from the computer game "Among Us" and set up a space ship with card board buildings from an old infinity starter set.  The Among Us models worked great, they were approximately 28 mm and they were also stamps!! To keep track of the damage and equipment of each crew member we used a sheet of paper that the kids wrote their character's names on and stamped them so we wouldn't forget.  During the game they also drew skulls on the character sheets to track damage.  In the game each team of three had to run around the spaceship doing tasks, but could also shoot at each other if they got close enough.

the kids seemed to enjoy the game.  I think they really liked the fast pace, dealing the cards to their crew mates and especially drawing on their character sheets.


Friday, May 27, 2022

Adeptus Titanicus – Battle Report 2

It has been along time but I have finally got another game in that was worth writing about, and not because I won. But, because it was a fun game with some useful observations that I wish to write down, and I got some pictures.


My friend and I decided to play a 1500 point game. It was a basic game with no scenario or special skills for princeps or legions. My list was chosen based on the warlord weapon sprue I got in the mail recently, giving me a Titanic Power Glove and Sunfury Plasma Annihilators. As well as my kit bashed Gatling Blaster that I am quite happy with. My maniple was two warlords, a Reaver, and a few knights. One Warlord was going to be the fire support, equipped with carapace missiles, Volcano Cannon, and Sunfury and the other warlord was the assault titan with the power glove, Gatling Blaster and carapace mounted Turbo Lasers.

The support titan is, in my mind, the work horse titan of this maniple. It will sit on the edge of the board firing all of its guns, hopefully out of range of the enemy titans. The banner of knights was also going to hang around this titan and provide a bit of a screen if enemy skirmishers got to close. It was given an oath banner to improve the resolve of the knights and the tracking gyros for the missiles so that they had a better arcs, because first fire orders don't let you turn...

The other warlord was the core of the assault force. This one was going to stomp down the middle of the board with a Reaver in support and hopefully get a chance to charge something it could crush with its glove. The power glove is very strong but since the warlord is so slow it can easily be avoided. I also gave this titan the Turbo Lasers and the Gatling Blaster, I don't know what it is but Gatling Blasters are my favourite weapon. They are kind of jack-of-all trades, but when enemy titans start taking damage and their armour weakens the number of dice with each shot from the Macro Gatling allows you to effectively aim your shots for a killing blow. I also gave this titan the Bastion of Shielding as I was anticipating this one to be the priority target of my enemy.

The Reaver would follow in close support and hopefully not be the enemies priority target. It had a Melta Cannon, Reaver Gatling, and Turbo Lasers, this load-out put is a general purpose load out giving it a preferred engagement range between 8 and 24 inches.

My opponent took his newest model, a Warmaster with Plasma Destructors. This titan is monstrous. Despite having almost zero flexibility in the load-out the standard weapons are devastating and the titan's toughness is impressive (at least on paper). The enemy force also had an expensive nemesis with the Quake, Volcano, and Melta Cannon. The Reaver had a power fist, carapace Turbo Lasers and Melta, clearly this one was going to be his assault force.

The deployment saw my opponent concentrate his forces in the centre and I split my forces to set up a flanking


Turn One. Too Much First Fire. In the first turn my opponent's Reaver moved aggressively towards my support Warlord and my assault force moved slowly towards his titans concentrating their firing arcs on the Nemesis. The other Titans all had first fire orders. Unfortunately since I had more units to activate and was activating second, once his Warmaster had orders I was able to move out of arc/range of the Warmaster's missiles and cannons. The firing this turn had voids on either side get knocked down but no major damage.


Turn Two 2 Focused Fire Kills the Reaver. While there was a bitter exchange on one side of the table, with the Nemesis and the Reaver collapsing their void shields and some damage getting through the big fight was on the other side. Unfortunately my opponent's Reaver (The blue one) did not have sufficient fire power to damage the Warlord and the combined fire of the warlord and knights, over two turns, was enough to destroy the Reaver only loosing one knight in the exchange. In hindsight The Reaver's load-out was too specialized to be operating independently and it was likely doomed the moment it set out across the city unsupported, even if the dice didn't help.


Turn Three. Nemesis and my Reaver die. In this turn both the Nemisis and my Reaver were destroyed in the firefight on the other side of the city. My Reaver was obliterated by the shear power of the Warmaster and his Nemesis fell to the targeted shots of the Macro Gatling Blaster and Turbo Lasers against the Nemesis's damaged leg My support titan was able to turn and provide missile support as well as some good void saves meant that my assault warlord was unscathed. The two remaining knights in the banner were also able to get to 9” from the Warmaster, perfect for charging.


Turn Four. Charge!! Charges in Adeptus Titanicus are devastating, if they get within 2 inches, not only does one melee attack happen in the movement phase and by pass voids they also get one more attack dice for each 3 inches of moment the titan makes. Also, the Warmaster stood still and took First Fire orders, in hindsight stepping backwards so my warlord could not reach and so that the knights didn't charge as far would probably have been a better choice. However, the Warmaster chose first fire, and did get a shot with the Plasma Destructor, it collapsed the Warlords void shields but that wasn't enough to stop the warlord getting it's fist in the Warmaster's face and allowed the knights to make a text book charge to the rear of the titan. The combined might of the power fist, knight melee weapons and the extra attacks for the charge distance all targeting the Warmaster's head were sufficient to kill the Warmaster before the end of the movement phase, and that was that.


Conclusion

Concentrating then diverging your forces is not as effective and as splitting and then converging your forces, the later requires thought and good timing. I was able to achieve an over-match on one side of the city and on the other I got lucky due to range and arc miscalculations, as well as dice. I think if the Nemesis had been supporting my opponents Reaver and the Warmaster blasted away at my assault titan from a safe distance the battle would have gone the other way.

Servitors are always busy. In my limited experience with this game it seems your servitors will always be busy venting plasma and repairing damage. Anything you can take to help these mechanics out will pay dividends in the battle, like Bastion of Shielding.

Carapace weapons have crummy arcs and poor short range engagement. I think the tracking gyros are a must include even if they pretty much double the cost of the weapons.

Firing sequence depends on if the target is shielded or not. With shields you fire from low strength to high strength and when shields are down you fire from high strength to low strength.

I think the to hit modifiers for cover in Adeptus Titanicus need a review. A half obscured Warmaster is more difficult to hit then three knights bounding across the field even though half a Warmaster presents a much larger target. They probably need something like if you can see less than a 20mm stand worth of the model it is -2...


Oh and knights are annoying, don't forget about them. Thanks for reading, I need to paint some scenery :(

Friday, March 18, 2022

Multiplayer Kill Team

So what do you do when an odd number of people show up to game night?  You play three player Kill Team, that’s what!  Thanks to the alternating action system of the new kill team it actually works quite well.  The only strange situation that came up was how to activate overwatch, but even that worked out.


The scenario we played was Master the Terminals.  In this scenario you get points for controlling a terminal and you get more points if the terminal has been disconnected from its two firewalls.  We chose this scenario because it was easy to modify the objective locations to add a third terminal and corresponding firewalls.  Once the objectives were placed we all took turns adding scenery and then rolled off to select deployment zones.  Deployment was no closer than 6” to an objective marker and no further than “12 from your chosen terminal.  This rule was okay but we also had a “don’t be cheesy” clause (I am not sure three players would work in a competitive gameJ).  After that the person who chose the first terminal deployed a complete fire team, or half of kill team if they only had one fire team. Then we went around with each player deploying half of their kill team until all the operatives were deployed.


After that the game ran pretty much like a normal game with an initiative roll at the beginning of each turning point determining activation order. Overwatch was allowed if a kill team had no more actions and at least one other kill team had operatives to activate.  Interestingly this didn’t happen all that often and I don’t think anyone felt it was unfair.


Turning Point 1 (T3, M2, H3). Both the Harlequins and Tyranids made use of their superior mobility to disconnect two fire walls while the marines only disconnected one.  Otherwise there was no shooting in the first turning point as the marines were being very defensive and the other two kill teams were assigned conceal orders.


Turning Point 2 (T7, M5, H6).  This turn got bloody with Tyranids and Harlequins put some pressure on the marines who stay in their deployment zone, but did lose two marines to the combined attack.  Both the Tyranids and Harlequins suffered losses attacking the marines and even more when they fought each other in the center. One harlequin did reestablish a firewall around the Tyranid terminal but they are quickly destroyed and the firewall again disconnected by the Tyranids.


Turning Point 3 (T9, M7, H8). More fighting but this time the Tyranids and Harlequins give up on the marines and concentrate on each other in the center incapacitating many operatives. There was one moment where a Harlequin with shuriken pistol and kiss charged a wounded Tyranid warrior in close combat and then blasted a Genestealer all without taking a wound.  That operative was then blasted by a venom cannon but they got the point across.


Turning Point 4 (T10, M9, H10).  By this point the Harlequins are exhausted and with one operative remaining decide to defend their own terminal.  The marines are too far back on points to win but play the spoiler to reestablish a Tyranid firewall and the game ends in tie between the Xenos, Better luck next time Emperor of Man.

So the game ended very close and everyone had fun, so I guess that is a win. Maybe it would benefit from Tac Ops cards for a few more options for gaining victory points. Certainly adding a bit of complexity would not hurt the speed, this game played in about the same time as a normal Kill Team game.

I think clearly the Harlequins were overly aggressive and it was the first time the list was being used but their maneuverability really showed its worth and their 3 victory points in the first turn kept them ahead of the marines. 

The marines were perhaps too timid, but with a smaller kill Team they did not want to loose operatives without a compensation in victory points.

The Tyranids played well, they kept their eye on the victory points and were given a bit of a blessing from the harlequins when they reestablished the firewall which allowed them to disconnect it again and score some more points.


Thursday, March 17, 2022

Full Thrust Review


So this post is going to be a bit different, my hope is to introduce the limited readership to a really fun game my friend has recently shown me. The game is Full Thrust and it is a space fleet tactical war-game.  It is approximately the same scale as Battlefleet Gothic but I am not sure how the rules compare.  It was invented by Ground Zero Games in the UK and is jointly promoted by them and MechWorld from Germany. No one has given me anything to write this post… but maybe they will ;)

A general overview of the mechanics are; pre planned movement, shooting with pools of dice (dice pool management), and a detailed damage system which combines to make it a fun game, but with large variance in a few small places.


The game is played over multiple turns with both fleets planning and then executing their moves concurrently.  I don’t think there is a set number and my games go to 7 or 9 but if I was better it would probably go longer.  The game take over 2 hours for the basic size fleets, shown in the pictures.  When my brother and I play we have even started moving each other’s ships which is possible due to the clear planning mechanics, but it does slow the game down a bit.

Shooting (in the basic game) is done with two weapon systems; laser batteries and torpedoes.  The shooting phase has alternating activation and beings with an initiative roll for who gets to pick the first ship to activate.  This is where the first bit of variance creeps in as once ships start getting damaged an early activation can be used to destroy a ship that then doesn’t get to retaliate. The order in which you choose to activate a ship is significant as well and totally controlled by the commander of the fleet, however there are turns where shooting first is just more important.  Once a ship is activated it can then target a number of ships based on the number of active fire control systems it has, this ranges from 1 to 3 on the big ships.  The strength of the batteries and torpedoes then depends on the approach of the two vessels with all weapon systems having a unique arcs and range dependent dice pools.  Laser dice pools are combined making it essentially one roll per target, if you have different coloured dice for the torpedoes.


Rolls to hit are standardized (4+, 5+ if the target has active shields) and the commander controls the chance of success by allocating more batteries to the target.  Once hits are scored the target vessel starts to take damage immediately and “hit point” boxes are crossed of the data sheet.  As ships take more damage, rolls are made for the different ship’s systems to determine if weapon, engine or even life support systems get knocked out. At the end of this part of the turn each ship can use their damage control teams to try and repair some damage however this is rare, and another place where some lucky dice rolls can provide an unexpected boon.

There is an advanced game that has missile boats and carriers, I guess the missile boats launch drifting mines that can intercept other vessels as they navigate the battlefield.  But I have not played this.


I think my favorite aspect of the game is the planning phase.  This is the phase where the players really do have all the control and try to outwit their opponent.  Much like the dial in X-Wing, or the orders tokens from Epic 40k, this provides the moment that generates the most regret and second guessing. The data sheets are also great, and simplify the complex damage accounting system into something that is smooth and plays well.  The models look cool to, oh and yes I think the light cruiser looks like the HALO rifle, and the cruiser came out first J

Tuesday, March 1, 2022

Kill Team Game 7 - Tyranids vs Chaos


Set Up, Escalation was the scenario selected for this week’s game.  This scenario has 6 objectives that start to disappear at the beginning of turning point two and also increase in value from 1VP to 2VP on turning point 3.  Chaos won the roll and elected to defended, their side had a vantage point with cover that would be a suitable place for the cultists shoot their autoguns from. Otherwise the setup was quite balanced.


Turning Point 1 (4-2, for Tyranids). In the opening Turning Point the Tyranids decided to move aggressively across the entire frontage of the board and secured 4 objectives, Chaos secured the other two.  The shooting was limited to the gunner operatives on both sides, who were effective, each incapacitating one enemy operative.  Unfortunately the Tyranid gunner with only 2 APL remained in the open while the Chaos gunner was able to move back into heavy cover.


Turning Point 2 (6 – 4, for Tyranids).  Objectives 6 and 4 were removed for this Turning point. Chaos won the initiative and took a plasma gun pot shot at the Tyranid gunner on top of the catwalk, with the help of a reroll the blast of plasma did an incredible 22 points of damage and vaporized the warrior before it could react.  Obj 1 became the focus for this Turning Point with cultists using their grenades and pistols to flush out a hidden Geenstealers, who were then countercharged and ripped apart by more Geenstealers.  Not wanting to slip any further behind on points the icon bearer also charged onto the objective. In addition two of the cultists around Obj 5 were killed by a Tyranid warrior who tried to secure that objective.  The remaining cultist on Obj5 responded with a spurt of flame doing some damage to the warrior.  Obj 5 would stay under the control of Chaos.  


Turning Point 3 (6 – 6).  Obj 3 and 5 were removed forcing all the operatives to the center and contest the remaining objectives that were now worth double points.  The Tyranids began the turn with a charge into the icon bearer killing him.  The Chaos Champion then showed the value of 3 APL by charging into the Tyranid that had killed the icon bearer killing it and then firing his pistol at the Tyranid leader who was now on Obj 2 after eating a hapless cultist.  Again the marine gunner showed his value by melting the last Tyranid warrior.  At the end of the Turning Point all but one Geenstealers was incapacitated and Chaos had lost about half of their kill team. Objective 2 was contested but Obj 1 was in the grip of chaos.


Turning Point 4. (6 -10, for Chaos).  Outnumbered and outgunned the loan Geenstealers sells his life dearly but is taken down by a gout of flame at very short range. With the opposition removed the Chaos kill team score 4 VPs to clinch the victory.

Conclusion. 

Mission. Each mission in Kill team is quite different, in this case the evolution of the objective inevitable forced both kill teams into the center of the battlefield.  It is important to understand the implications of the mission. In this scenario 12 of the 18 potential points could come from controlling the center for four turns.

Plasma guns seem way too good, in many cases they are preferable to heavy gunner options in most kill teams.  This is also not the first time I have noticed the power of these weapons.  My opinion is that their normal damage should be reduced by 2 and their critical damage should be reduced by 1, but they should still retain their Armour Piercing special rule.  Armour Piercing is very powerful and when fired on hot the plasma gives very reliable damage.  In addition the disadvantage of the hot rule can be effectively mitigated by the kill team’s good luck token (most kill teams have access to this for 2 or 3 equipment points).

After the game my initial reaction was that the Tyranid forces spread themselves out too thin.  But on reflection I think they just lost too much in the center where the majority of victory points were to be had.  Again the 3 APL pop up attacks were powerful. Likely the best counter is to just charge the elite team’s gunner as soon as possible. Perhaps the Geenstealers needed to focus more on killing marines and should have tried harder to ignore the cultists… I don’t know, certainly we should play more games.