Showing posts with label Conversions. Show all posts

Saturday, August 15, 2020

Tallarn Desert Raiders Flamer Conversions WIP

 I love my Tallarn Desert Raiders Imperial Guard Army. I will never sell it.

BUT, when GW made these guys, they decided to NOT include flamers or heavy flamers as part of the weapon loadouts.

After many ebay purchases, I have obtained quite a number of Tallarn Desert Raiders. The main box came with a Melta guy, so I have plenty of those. I also have only 2 Plasma guns, a single Grenade Launcher, and assorted heavy weapons.

BUT no flamers! Thus with all my spare time with COVID, I decided to change this with a little ingenuity. I shall explain my process below the pics. I present; 3 flamers & a heavy flamer WIP. I was encouraged by original Ogryn Conversions (here and here but they've since been rebased) and am getting more comfortable with green stuff in general.


Process Regular Flamers:

  1. Purchased several flamers + 1 heavy flamer Imperial Guard bitz, including Gas Tank backpacks from ebay (pretty cheap).
  2. Took 3 existing melta guns that I had purchased (the red paint job is old), and sawed off the Melta bit.
  3. Also had to grind their backs a little bit to remove the head covering ends etc. to make way for the gas tank(s). Not too much is needed if you're cool with a "slouched" diagonal look to the gas tanks.
  4. Took 2 flamer gas tanks, and cut them in half, carving them down so that they looked like a single tank backpack. This is to help differentiate the heavy flamer from the regular flamers on the tabletop from a distance.
  5. Cut off the flamer "flame" bits from the original flamer arms and glued them onto the end of the cut down melta guns. Now the melta guns looks like flamers
  6. Took 1.5mm jeweler's wire which is very flexible, and cut it down to the right length
  7. Drilled shallow, roughly 1.5mm holes in the end of the gas tank as well as the bottom of the melta gun. I found the part where the other piping goes in looks logical.
  8. Glued the wire into the gas tank and the melta gun
  9. Hey Presto! Instant Tallarn Flamer dude
Process Heavy Flamer:
  1. This guy was neat because he's actually an older missile launcher guy who was missing his missile launcher arm. I had nothing for him to do...
  2. Had to grind down his shoulder a little bit and bend his holding arm, but eventually got it to a good place where it looks like he's holding the Heavy Flamer with both hands. But it's a great look
  3. Grind his back a bit to accommodate the flamer tanks.
  4. Glue the double gas tanks onto his back. I keep the double tanks since he's "heavy" so will need more gas, and at a distance I'll be able to easy tell he's the heavy. I'm not a HUGE fan of the heavy flamer weapon model, but that's ok. I think it would look better if it were more horizontal instead of vertical.
  5. The piping almost fit, but needed a bit of hot bending, and I broke it a bit so will have to fill in with Green Stuff eventually
  6. Also, since he's supposed to be holding a missile launcher against his head, I'll need to Green Stuff the side of his head to fill it out a bit. Otherwise it looks a bit flat.
  7. Hey Presto! Instant Heavy Tallern Heavy Flamer dude.
Even if I don't use them in 40k which I don't really play, I could play One Page Rules Sci Fi or Kill Team.  These guys will be a great addition. I'll update once I've got the Green Stuff in place, and might have undercoated 'em.

Sunday, March 20, 2011

Vendetta, Ogryn Chimera, Tallarn Sentinel Done

Its about time, but I have FINALLY finished the Vendetta, the Ogryn Flamer Turret and the Tallarn Sentinel Scout. I'm really happy with all of them. The Vendetta took a LONG time to do, but the outcome is really good I think. Although I still have to dull coat everything (except the canopy), I figured I'd post since I can now start on the easier stuff for the Tallarn 110th Battlegroup. I didn't bother painting the other weapon loads just yet since I'm only going to use the Vendetta, but when I decide to use 'em I'll finish them off. The priority is to get everything ready in time for the tourney, and so I can start painting something else...

Probably the hardest part of the Vendetta was the camo scheme. I had to highlight and shade each panel by hand. Next time I'll do a spray job (when I get a spray set). Something cool to note, the canopy also has the camo scheme going up onto it. The base is a bit meh, but since it matches the rest of the army, I had to do it. When I start my Black Templar army, I'll start doing better bases.

Had to give 'em the fighter pilot's helmets even if this is an Apache/Blackhawk type attack transport. And I even named them Cougar and Merlin. Maverick and Goose was just lame (and their helmet's weren't as interesting). I have removed the magnetized twin linked lascannon so you can see the names better. You can also see the screws painted onto the turbine fans to show that they are turning, although now that I think about it, they should be a blur right now..... oops.

This shot gives you a good view of the underside. I felt like WW2 British fighters were the way to go, so underside=sky blue, topside=camo. Also get a good shot of the magnetized twin linked lascannons.

Next up is the Sentinel. Quite a nice Forge World model. So now I have 2 scouts, and 2 heavies. These guys will flank along with the Vendetta with the help of the Astropath..

The multilaser is magnetized, so can be pulled off and replaced with a lascannon if I so choose. For now, the multilaser stays..

Forge World did such a nice job of the detail on the driver, that I felt it was necessary to swing his door open so you could see him better. I have no idea why the door is open... Maybe he needed a better look, or perhaps it got blown open by mistake. Either it took some very careful exacto knife work to cut it out and glue it on properly.

And last up is my favourite conversion, the Ogryn Heavy Flamer turret. He came out GREAT, and he can even rotate, as well as be pulled off for easy returning of the chimera to a regular vehicle. I'm still debating whether to give him a hose leading from the gun down into the Chimera, or have some kind of tank next to him, but for now he'll do.

Next up will the rest of the Tallarn troopers to fill out the platoon of 30, the commissar, and the Astropath. After this lot, that should be easy...

Wednesday, February 16, 2011

Vanquisher Custom Turret and Tallarn Tourney Progress

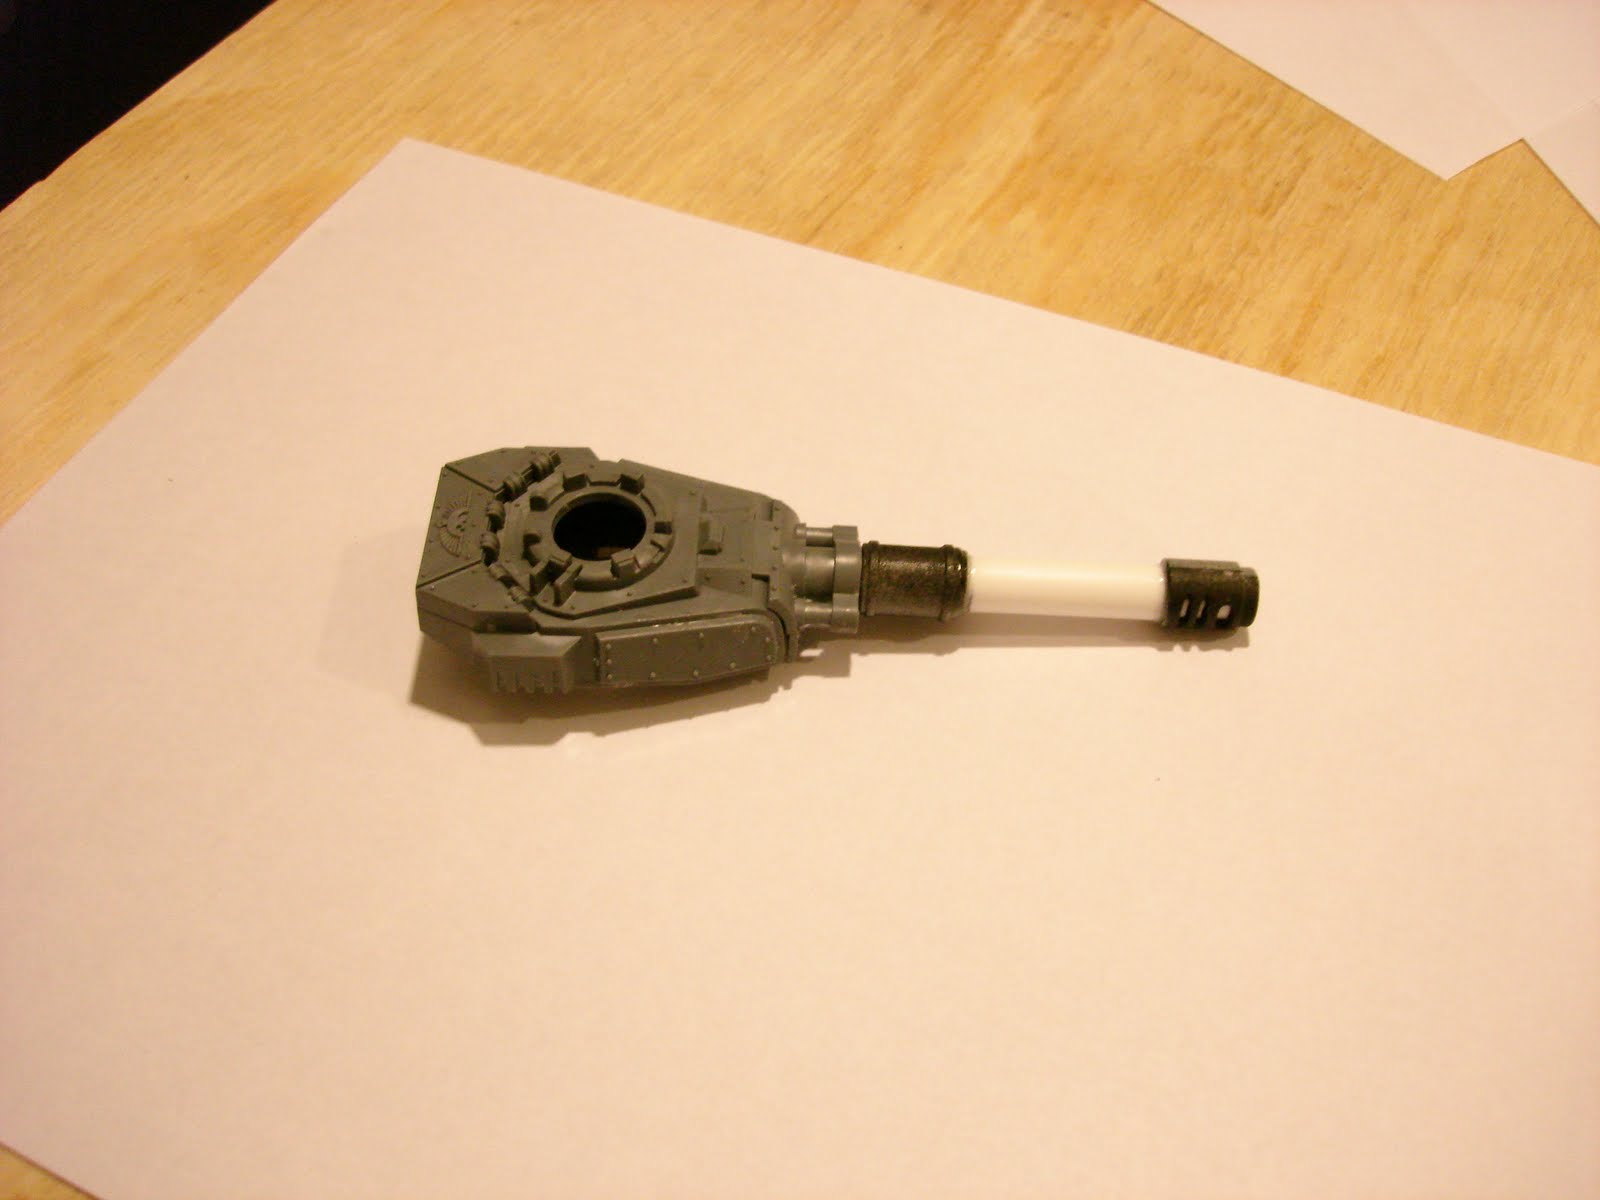
So I went out and bought a Leman Russ Turret (Demolisher) on eBay about a year ago on the theory that I could convert one of my existing tanks into a 2nd Demolisher..

There were two flaws with this plan:
1) I like the Vanquisher better than the Demolisher and probably should have bought a Vanquisher turret instead.
2) The turret ring of the new GW tanks is completely different from that of the older tanks such that they don't fit together.

Happily, I found a way around the problem.

This is the parts I had. I cut down the Demolisher turret, and a spare battle cannon I had laying around. I also have 2 styrene tubes. One of the same diameter as the battle cannon's barrel, and one that is *just* smaller and fits inside the larger one.

The glue acts as a filler so that any bad cuts I made on the tubes are covered up.

The smaller tube is so that the tubes all line up correctly (I tried without it, and the barrel looked crooked. NOT badass at all). The length of the styrene is based on a measurement I did of the Vanquisher vs Leman Russ tank diagrams in the Imperial Guard Codex.

This is a shot of the Forge World Tallarn Tank commander I've had laying about for a while. I plan on putting magnets under his base. He can then act as Pask, a special IG tank commander to the Vanquisher OR as Al'rahem. So that will be a 3+ to hit that pesky Land Raider at the tourney, and a 2D6 + 8 Str hit. I'm hoping it will KILL it, as I hate those Land Raiders, I really do. Alas this tank probably won't be in the tourney as I have other stuff in prep right now, but I figured it was a good time to getter done anyway. With the magnets I can give him some nice legs (maybe a plastic Cadian trooper) to be Al'rahem as the current miniature of Al'rahem is AWFUL. But what happens if I want Pask AND Al'rahem...? Probably won't have that many points anyway..

I had to cut down the original tank ring, and replace it with my own custom plastic one. This ring was made by an FDM machine at my work. It basically will make any 3D shape you like in plastic, and it took 10 minutes. So with a pair of callipers and Solidworks, I created this, and glued it onto the underside of the tank turret. For comparison you can see the original (much smaller) turret inside the custom one.

My measurements were a little off, and this turret required a bit of paper shim to keep it level. I shall add real shims in due course, but at least you get the idea.

I'm quite proud how this turned out especially since its been on the back burner all this time.

And just in case you think I've been slacking while Ghoulio and Big Willie have been painting up a storm, here is a shot of the stuff I've been REALLY working on. The Valkarie/Vendetta is coming along nicely although I recently had to tear the engines off because I couldn't paint the top of the fusilage easily. Outlining it is also a pain but worth it I think.. You can see the underside is done is sky blue (the upturned wing), and the top in my Tallarn Camo, so he'll match the rest of the vehicles. I'll keep all the doors closed, but they can open technically if I really want to. I'll also leave the wings off so that I can take his baby in my foam case. Also finished and ready to be based is the FW Sentinel (lower center of pic). The Ogryn Chimera turret is mostly based coated, and I'll paint him properly soon (lower left) as well as the Commissar and Astropath that I paint while waiting for the Valk to dry.

Sunday, December 5, 2010

Ogryn Mobile Turret

This guy isn't painted yet either, but I figured it was time to get it up and running. Some green stuff and super glue later, and here is the Tallarn Ogryn Chimera Turret.
I needed a way to show that this Chimera had my 5-6 Ogryns in it, so I thought it would look cool if the Chimera didn't have enough room for the turret mechanism so they took out the turret, piled some sandbags, and one of the Ogryns grabs the heavy flamer and uses it. Living turret! And I wanted to make a "turret" that was removable so that if this Chimera was not going to be carrying Ogyrns, we can go back to the original turret.

Anyway here he is. He's even older than the OOP Ogryns I use as my troopers. I think he's first generation! But I got him from a gaming buddy, and his goggles really work with the open top desert look. I was really close to giving him an Afrika Korps style cap, but decided the face material would be enough. The arms and hand of course had to be cut and re-glued so that they were facing the right way. Might also add in a flame thrower hose and tanks after he's properly painted. Also have to remove the heavy flamer tab that was from the Sentinal sprue that the flamer came from. The Chimera body is from the only Chimera I've fully painted so far so I wanted to show it in its glory (pre-painted)

Tuesday, June 22, 2010

Tallarn Ogryns Complete

I'm almost embarrassed to post given the true level of awesome that is 's work, but here we go anyway with the finally complete Ogryn unit.
Here are the two new boys. A guy with complete head dress, and the gritty sarg with Blue sash of title. I wanted these guys to be mimicing my Tallarn humans as much as possible so their color scheme is close, and they have the Tallarn headgear, and blue "veteran" sashes. Quite pleased with how they turned out. Now all I gotta do is take some better photos. My new wife and I are moving to a place that has a rec room in the basement, so a nice place for a permanent painting space!
And a group shot since they are now a team.... a super team. Just have to paint a Commissar Lord to lead them, and a Chimera for the whole assault squad to ride in.

Tuesday, March 2, 2010

The Wolf Lord comes!!!!

With the Olympics on and a chance to sit down and watch some I started to put together my newest edition to the Space Wolves. I had origingaly picked up the Canis model so I would be able to do this with it until a kit came out. When I opened the box it had been mispacked and there were no Wolf Claws inside. So after a quick call to GW customer service and a couple of weeks waiting for the mail, I now have another complete Canis model and one that I can make into a Wolf Lord. Of course he can be used as a Thunder Wolf Cav, Iron Priest or Wolf Guard Battle Leader depending on what you want. I magnetized the arms so I can swap to any weapons combination I want. Very easy and cheap conversions involving the GW pin vice and some small rare earth magnets. I'm a big fan of this type of work, stay tuned for when I do my 2nd Land Raider up, it can switch between all 3 varieties.


I need to green stuff the gaps in the model (which aren't very big) and then he's ready for priming!

Finally I have been working on a side project for sometime and had the chance to get my hands on these oldies. The intent is to use the Tech Priest and Thudd Gun as a Thunderfire Cannon, and the Chaplain as a Chaplain (what else would it be?) for my Heresy-Era Imperial Fists (Guys that were on the Imperial Palace during the siege of Terra). This army is really going to be something to see!

Tuesday, December 1, 2009

3 of da Ogryns is done Boss

So here are 3 of the Ogryns that I greenstuffed a month or two ago. They turned out quite well. Details I quite like are the eye pieces, and even stains on their white shirts (see the back of the middle guy), and the stubble on their chins. The headgear also turned out very well I think. I've almost finished the other 2, and then onto the last Sentinal. Can't wait to see how these guys do in battle..